Infosysta – Digital Transformation Experts

    • ABOUT US

      Who we are

      Understanding our organizational identity.

      What we do

      Our core services and expertise.

      History

      Our journey through time.
      Trusted relationships and satisfied customers.

      Vision, Mission & Values

      Our guiding principles and aspirations.

      Our team

      Meet our talented professionals.
      Explore our exceptional product lineup for diverse needs.
    • SERVICES

      Implementation and Integration

      Migration to the Cloud

      Migration to Data Center

      Licenses Management

      Managed Services

      Resource Staffing

      Training and Certification

    • SOLUTIONS

      Digital transformation

      Business Process Management

      Agile Project and Portfolio Management

      Collaboration solutions

      Demand Management

      DevOps

      Application Lifecycle Management

      Service Management

      App Development

      Legal Practice Management

  • Our Partners
    • RESOURCES

      Stay connected with industry insights and updates.

      Testimonials

      Hear from our satisfied customers.

      Case Studies

      Real-life success stories and remarkable results.
      Explore our latest articles, tips, and stories.
  • Careers
  • Contact Us

How to Integrate teams
working in Jira and Salesforce

This article was written by Teja Bhutada from Exalate

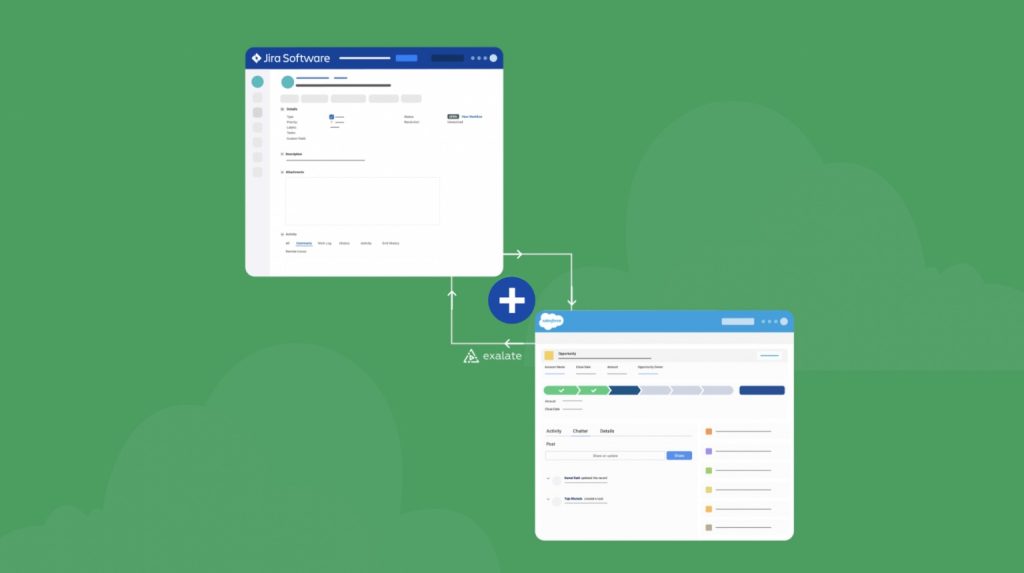
Jira and Salesforce need no introduction. They both are popular tools teams use to manage business-critical information necessary for their day-to-day operations. So a flexible integration between these tools can further drive revenues by facilitating a consistent and accurate view of information throughout the business ecosystem. 

Let us then see how we can implement a Jira Salesforce integration that can help teams shift from viewing scattered information across tools to having a unified view.  

Keep Your Teams Synced 

Expertise and information if passed between teams can help them collaborate with each other and achieve common business goals. 

For instance, your product development team using Jira can benefit from having a complete overview of customer issues, feedback, and queries from Salesforce so that they take up important feature requests or product updates instantly. 

At the same time, your sales team using Salesforce can have status updates on Jira issues or bugs raised by high-value customers. So that they always have the most recent update on the issue. 

But if all this valuable information is passed manually through phone calls or emails, or by simply switching between different applications, it leads to inaccurate, misplaced, duplicated, or altered information, in turn increasing friction amongst team members. 

A Jira Salesforce integration here can help information pass automatically, in real-time between teams so they can absorb it within their own familiar environment. It will also help reduce manual data entry errors and much more peaceful coexistence for them.

But before getting to the implementation, let’s see why choosing the right solution can help drive the benefits you expect from such an integration. 

Choose the Right Solution 

For an integration tool following must be your possible drivers:

  • Security: It is provided through encrypted file transfers, HTTPS protocol, role-based access control, and the like. 
  • Decentralized integration: Each side of the integration has the control to independently configure what information is sent and received. This will ensure autonomy on both sides of the integration. 
  • Flexibility: Integration requirements change frequently. So, advanced configurations with minimal tweaking to adapt to different integration scenarios are important. 
  • Reliability: Handling downtimes and system failures gracefully without manual intervention such that the integrating parties don’t even notice the outage. 
  • Number of Integrations supported: Having the same tool support additional popular integrations means that you can use the same tool for your other internal or cross-company integration

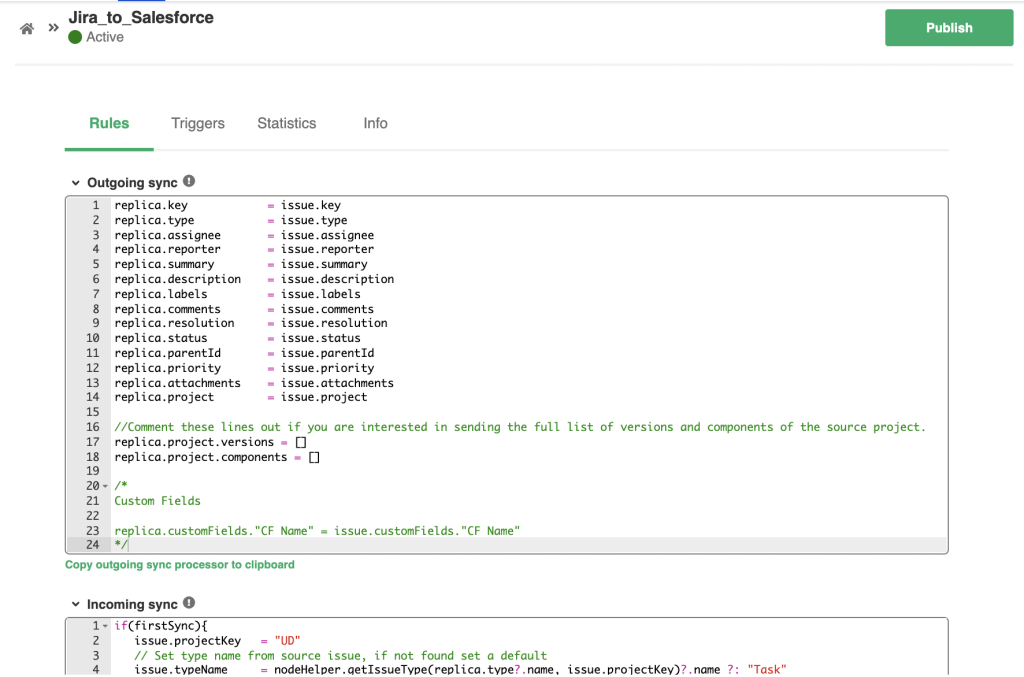
With the above points in mind, I have chosen Exalate as the preferred solution because it inherently supports all the above-mentioned features. 

Note: Check out this whitepaper to learn more about its security and architecture. 

This solution supports integrations with popular tools like Zendesk, Azure DevOps, ServiceNow, GitHub, HP QC/ALM, etc.  

Now let’s see how we can implement the integration so your teams experience a frictionless collaboration.  

How to Integrate Jira and Salesforce in 6 Steps  

We first need to install Exalate on both sides of the connection. 

Step 1: Install Exalate on Jira

Exalate can be installed on both Jira cloud and Jira on-premise. Check how it can be used with Jira Cloud and Jira on-premise.

We will see how to install it on Jira Cloud here.

Click the settings icon at the top right of your Jira instance. Select “Apps”. 

On the left-hand menu, click “Find new apps”. 


 Click “Try it free”. The installation wizard after this is pretty easy to follow.  

Step 2: Install Exalate on Salesforce

Exalate for Salesforce supports syncs for many Salesforce entities, but the most popular ones are: Opportunities, Cases, Accounts, Products and Tasks. You can check the detailed installation procedure here

You can request an Exalate for Salesforce node through the Exalate’s  integrations page.


Choose Salesforce and fill in the pop-up form that appears and follow the installation instructions thereon. They are straightforward and easy-to-follow. 

Now that you have installed Exalate on both Jira and Salesforce, you can proceed to the next step. 

Step 3: Connect Jira and Salesforce

To start using Exalate, one side of the integration initiates the connection and the other side accepts the invitation. You can start from either side since Exalate has a uniform UI across different instances. 

We start with Jira.  

Head to “Connections” in the left menu and click “Initiate connection”.

Then enter the destination URL, i.e Salesforce. 

Exalate performs a quick check to see if it’s installed on the destination instance. You can then choose the configuration type.  

The first type is “Basic”. This mode has an automatic mapping of basic Jira and Salesforce fields that cannot be edited. So you can use it for simple integration cases. It also comes with a Free Plan that allows up to 1000 free syncs per month. 

After you select “Basic”,  click “Next”. 

Enter the case key to synchronize. If you navigate to the Jira instance right now, you will be prompted to enter the issue key instead. 

Note: The case key is copied from the URL of the specific case. 

Either way click “Exalate”. 

After a while, a successful synchronization looks like this. 

The other type is “Script”. It is suitable for advanced integration cases as you can configure a scripted connection using “Groovy Scripting language” and can sync almost any kind of information. So I recommend using this mode if you want to use Exalate’s maximum flexibility. 

Select “Next” and then give a name and description to the connection. Then click “Initiate”. 

Select a project. 

An invitation code is generated. Copy it and head to your Salesforce instance. 


There on the “Connections” tab, click “Accept invitation”. 

And paste the copied code. Click “Next”. 

The connection has been established. You can proceed to configure it. 

Step 4: Configure the connection and define what should be shared 

Configuring the connection means controlling the behavior of your synchronization. You can do this by clicking the “Configure Sync” button above. 

Note: In case you have closed the above window, go to “Connections” and click the edit connection icon in front of the connection name. You will be redirected to the same screen shown below. 

Click “Rules” there. 


These sync rules provide mappings between Jira and Salesforce fields and are written in “Groovy scripting language”. They are present on both sides of the connections and can be edited on either side. Outgoing sync rules control what information is sent while the incoming sync rules control how information is received. 

To stop sending or receiving information, comment or delete the rules. To add  extra information, you can use scripts

Step 5: Create triggers and automate the synchronization

Proceed to create “Triggers” by clicking on the tab. 

Click “Create trigger”. 

Triggers are created so that when the condition set in the trigger is satisfied, synchronization automatically happens according to the sync rules set in step 4. 

This trigger screen is on both sides of the connection. The conditions however are platform-specific. 

We are looking at the one on the Salesforce side. Select the entity from the dropdown list. 


In the “If” section, mention the condition for trigger i.e Salesforce Object Query Language for Salesforce and Jira Query Language for Jira. 

Add “Notes” describing the trigger. And don’t forget to toggle the “Active” button to activate the trigger. Click “Add”. 

You can choose to synchronize existing Jira and Salesforce fields meeting the trigger condition using the “Bulk Exalate” option. 

Finally, click “Publish” to save the changes you have made.  

Step 6: Start synchronization

There are various ways to start synchronizing information: by creating triggers, by syncing an issue or Case in Basic mode, by using connect operation in Jira or the bulk connect option. 

Conclusion 

A Jira Salesforce integration can help different teams collaborate effectively with each other in a hassle-free manner. They no longer need to copy-paste information manually between Jira and Salesforce, instead you can leverage an automatic, real-time synchronization between these tools. 

For this guide, I have used an integration solution called Exalate that supports different integrations with popular task management systems like Azure DevOps, ServiceNow, GitHub, Zendesk, HP QC/ALM, and more. 

It also  synchronizes information securely, has an intuitive scripting engine for advanced integration cases, and uses a sync queue to apply changes automatically in case of downtime.